Blockchain – Big Topic broken down to pieces Part 2 (Bag Custody Sample)

bccloud3

I will continue the exploration of the basic components of the blockchain technology started in the previous post, where I implemented a basic java class to visualize hashing and the linking of blocks (chain). To provide a sample for the aviation industry walking along the use-case of tracking the baggage custody changes during a flight journey .

3. Validation

A blockchain need to be validated otherwise we would not know if data was changed or corrupted. We have to iterate through the sequence of blocks, for this we create an array of bag transactions to allow easy iteration and compare the stored hash of each block with the recalculated hash. If the values match the blockchain is valid, if not it is corrupted (and all subsequent blocks). Ideally this would be event-driven, any change to the blockchain triggers the revalidation. In a real-world implementation changes through the endpoints would not be possible, something we will look at later when working with Corda or Ethereum.

		String currentBagBlockHash = "0";

		String myBagTag = randomBagTagID();
		String myPNR = randomPNR();

		ArrayList allBagTransactions = new ArrayList();
		BagTransaction tempBagTransaction = null;

		// Print Bag Tag (Genesis Block)
		tempBagTransaction = new BagTransaction(myBagTag, myPNR, Entity.NIL.name(), Entity.PAX.name(), 0, "0");
		currentBagBlockHash = tempBagTransaction.getHash();
		allBagTransactions.add(tempBagTransaction);

...

public void checkBlockchainIntegrity(ArrayList allBagTransactions) {
	// Check Blockchain. Compare recalculated hash with hash attribute stored

	for (BagTransaction b : allBagTransactions){
		System.out.print("Block " + b.getBlockID() + " Stored Hash: " + b.getHash() + " -- Calculated Hash:" + b.createHash());
		if (b.getHash().equals(b.createHash()))
			System.out.println(" -- OK");
		else
			System.out.println(" -- FAIL. Blockchain broken.");
	}
	System.out.println(" -- ");
}
	}

For better reading we convert each block into a JSON object.

{
  "timeStamp": "2018-08-26T09:18:09.227Z",
  "blockID": 0,
  "blockHash": "ce41abbf21a162152e30fc511eaf594db43c84948691d12ef78fad6f31fa6043",
  "previousBlockHash": "0",
  "bagTag": "5347241966",
  "pnr": "EONT9T",
  "custodyTransfer": [
    {"transferFrom": "NIL"},
    {"transferTo": "PAX"}
  ]
}
{
  "timeStamp": "2018-08-26T09:18:09.287Z",
  "blockID": 1,
  "blockHash": "6b6073122ef996acc1e3c3e74c3963b5903112800781b4ba88e96baf0a8e2e04",
  "previousBlockHash": "ce41abbf21a162152e30fc511eaf594db43c84948691d12ef78fad6f31fa6043",
  "bagTag": "5347241966",
  "pnr": "EONT9T",
  "custodyTransfer": [
    {"transferFrom": "PAX"},
    {"transferTo": "AIRP"}
  ]
}

Running the validation for a clean and corrupted blockchain

Block 0 Stored Hash: ce41abbf21a162152e30fc511eaf594db43c84948691d12ef78fad6f31fa6043 -- Calculated Hash:ce41abbf21a162152e30fc511eaf594db43c84948691d12ef78fad6f31fa6043 -- OK
Block 1 Stored Hash: 6b6073122ef996acc1e3c3e74c3963b5903112800781b4ba88e96baf0a8e2e04 -- Calculated Hash:6b6073122ef996acc1e3c3e74c3963b5903112800781b4ba88e96baf0a8e2e04 -- OK
Block 2 Stored Hash: a33bbb5ebdec589e9f1b7c7952d6fef3fae2235b5a0600b8755b07040bba8227 -- Calculated Hash:a33bbb5ebdec589e9f1b7c7952d6fef3fae2235b5a0600b8755b07040bba8227 -- OK
Block 2 Stored Hash: 464319fed3a2c49df9a1fbeedae3f3e7c6692db0f6ab97a4c983f9fdf4269e6d -- Calculated Hash:464319fed3a2c49df9a1fbeedae3f3e7c6692db0f6ab97a4c983f9fdf4269e6d -- OK
-- Now corrupt Block 1 by changing the data
Block 0 Stored Hash: ce41abbf21a162152e30fc511eaf594db43c84948691d12ef78fad6f31fa6043 -- Calculated Hash:ce41abbf21a162152e30fc511eaf594db43c84948691d12ef78fad6f31fa6043 -- OK
Block 1 Stored Hash: 6b6073122ef996acc1e3c3e74c3963b5903112800781b4ba88e96baf0a8e2e04 -- Calculated Hash:09fd4223571f079258bd69d935f99cb552cd3ac0854410b81a2313d215929ebd -- FAIL. Blockchain broken.


4. Mining Blocks

Now we get to the first more complex concepts of the blockchain, the mining process. We are still operating at a very basic level though with a single node, but we can introduce the mining operation. Without going into too much detail, mining blocks is the step to close/hash a block and creating a new one as part of the consensus process. The incentive to the miner community is a transaction fee given to that miner that solves a hard cryptographic problem first. The more computing power you invested in, the higher chance you have as miner to solve the problem and get the fee. Based on scarcity this consensus approach is called Proof-of-Work (recommended reading). Unfortunately this lead to the current hardware race consuming vast amount of energy for literally no purpose (you let CPU/GPU’s guess numbers basically). This is seen as limitation, together with the long transaction times, and some blockchain start to move to other concepts, such as Proof-of-Stake.

Breaking down the Proof-of-Work to a simple algorithm, we build a hash function that need to create a certain pattern before being accepted. The hash of (data current block + hash previous block + a nonce value) need to have a number of leading “0” in front. The number of “0” is the difficulty and the nonce is an integer value that is changed/increased until the hash matches the required pattern.

public String mineHash(int difficulty) {
	String returnHash = "";
	String tempHash = "";

	String target = new String(new char[difficulty]).replace('\0', '0');
	tempHash = createHash();

	while (!tempHash.substring(0, difficulty).equals(target)) {
		nonce++;
		tempHash = createHash();
	}

	return tempHash;
}

With a growing difficulty (more leading “0”) it takes obviously longer to crack the challenge and with more CPU power you can run through the guessing cycle faster. Some samples below with increasing difficulty running on an ordinary notebook i7 CPU (java executing on a single core/thread in this case).

Difficulty: 1
Attempts: 11
Milliseconds: 10

Difficulty: 2
Attempts: 393
Milliseconds: 30

Difficulty: 3
Attempts: 1.794
Milliseconds: 40

Difficulty: 4
Attempts: 115.756
Milliseconds: 230

Difficulty: 5
Attempts: 3.366.041
Milliseconds: 3.210

Difficulty: 6
Attempts: 5.322.279
Milliseconds: 4.530

Difficulty: 7
Attempts: 76.339.743
Milliseconds: 60.850

Block
{
  "timeStamp": "2018-08-26T10:38:36.734Z",
  "blockID": 0,
  "blockHash": "0000000158d606c953a5df346d459aad949e9dbb4abe74f30ecf225c23112b14",
  "previousBlockHash": "0",
  "bagTag": "7821666095",
  "pnr": "ZHY4RT",
  "custodyTransfer": [
    {"transferFrom": "NIL"},
    {"transferTo": "PAX"}
  ]
}

Have a look at the below website for the current real life difficulty for bitcoin (hashing algorithm not implemented in the simple way we did it here for illustration purpose). Looking at the current difficulty (6,727,225,469,722) you can guess what kind of hardware setup you need to be fast. I gave up beyond difficulty 7 with the algorithm above.

Bitcoin Difficulty

Stay tuned for more blockchain.

Disclaimer: This discussion, datamodel and sourcecode or application is for study purpose solely. It does not reflect or replicate any existing commercial product.

Sourcecode at github

d3.js with Dynamic Data II

A slightly adopted version using SVG. A form to control radius of randomly drawn circles.

<!DOCTYPE html>
<html>
    <head>
        <title>Hello, data!</title>
        <script type="text/javascript" src="lib/d3.js"></script>
    </head>
    <body>

        <form name="myform" onSubmit="return handleClick()">
            <input name="Submit"  type="submit" value="Radius" />
            <input type="text" id="myRadius"/>
        </form>

        <div id="viz"></div>

        <script type="text/javascript">

            var mySVG = d3.select("#viz")
            .append("svg:svg")
            .attr("width", 600)
            .attr("height", 400);

            function handleClick(event){
                console.log(document.getElementById("myRadius").value)
                draw(document.getElementById("myRadius").value)
                return false;
            }

            function draw(rad){
                mySVG.append("svg:circle")
                .style("stroke", "black")
                .style("fill", "grey")
                .attr("r", rad)
                .attr("cx", Math.round(Math.random()*600))
                .attr("cy", Math.round(Math.random()*400))
            }

        </script>
    </body>
</html>

SVG circles

d3.js with Dynamic Data

On the journey to learn d3.js it is most important to understand the basic principles first, but once you got your hands dirty, thanks to lots of samples, you want make data ‘speak’. The available samples refer to static data sitting in variables or coming from a json or csv files, sooner or later you want to feed data dynamic into your visualization. In this very simple sample we want values from a form sitting on the same html page to be added to a list, as simple as no svg involved.

<!DOCTYPE html>
<html>
    <head>
        <title>Hello, data!</title>
        <script type="text/javascript" src="lib/d3.js"></script>
    </head>
    <body>
        <form name="myform" onSubmit="return handleClick()">
            <input name="Submit"  type="submit" value="Add Value" />
            <input type="text" id="myVal"/>
        </form>

        <p></p>
        <p></p>
        <p></p>
        <p></p>
        <p></p>

        <script type="text/javascript">

            var dataset = [];
            for(i=0; i<5; i++){
                dataset.push(Math.round(Math.random()*50));
            }

            var p = d3.select("body").selectAll("p")
            .data(dataset)
            .text(function(d,i){return i + " : " + d;});

            function handleClick(event){
                console.log(document.getElementById("myVal").value)
                draw(document.getElementById("myVal").value)
                return false;
            }

            function draw(val){
                d3.select("body").append("p");
                dataset.push(val);
                var p = d3.select("body").selectAll("p")
                .data(dataset)
                .text(function(d,i){return i + " : " + d;})
            }

        </script>

    </body>
</html>

Dynamic Data

In the next step we will play with some svg, from there I will explore ZK feeding a visualization from a DB or any other feed.

Online IATA Telex Processor

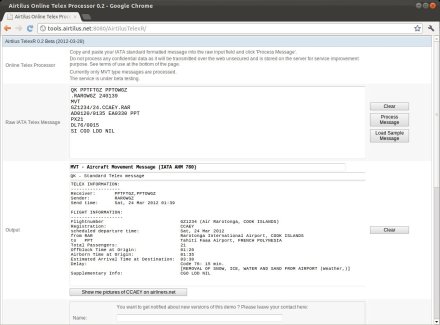
I launched a first version of a Telex processor with a web frontend. It is a beta version and currently only processes MVT standard messages.

Some words about the requirements for a flexible interface processor

  • Though IATA Telexes are defined by a standard, variations are common because some are produced automatically by other systems and some are created manually, which causes more errors. The processing of telexes, the pattern recognition, must be flexible enough to be able to handle extra inline whitespaces and dots, as well extra lines with free text or extra headers and trailer, eg. now it is more common to receive telexes via email and often some extra email information is added as header before it reaches your system. Customers also might create their own telex standards, meaning the whole message is transported as free text message, but inside the message the customer uses his own syntax for data transmission.
    This requires a message interpreter that can be configured for new or non-standard formats on the fly, without the need to change any sourcecode and to redeploy a system.
    (I saw a project at one airport where the change of LDM format interpretation would have cost the customer around 10.000 Euro because one of the cargo airlines send messages with an extra header line)
  • Other standard messages, such as AFTN, NOTAM or CFMU should be processed by the same engine using the same approach. One interface engine with the flexibility of the scripts covers the various aspects of the different types.

A few words about concept and architecture

  • ESB
    Certainly the word ESB sometimes might appear bloated like other IT buzzwords, but it hardly makes sense today to implement distinct own interface systems for every protocol or subsystem type you come across. In a heterogeneous IT landscape like an airport an ESB allows you to easily connect inbound and outbound to a number of other systems via TCPIP, Email, FTP,.. or even talk to other standard systems like SAP, Salesforce.com and so on. We use one connector to talk to the ESB, the rest we orchestrate in the ESB itself. With MULE ESB we have the freedom of an opensource product as well the power of enterprise support. The learning curve for MULE is not too steep.
    For the sample of telexes: Sometimes you ‘receive’ telexes by using the auto export function of the Sitatex application and retrieve the files with the messages via FTP, or you receive the messages as email or via a queuing server from a central corporate entrypoint. We can swing over to another source or run in parallel without touching the main system.
  • Script Engine
    Instead of hardcoding the various formats, we use a Java Script engine executing Groovy Scripts. These scripts, one for each message type, are stored in the DB and can be adjusted or customized easily. The scripts produce an internal XML formatted standard output which easily can be un-marshalled during the downstream processing using proper XSD.
  • Data Processing
    Whatever requirements you have how to handle the received data. In our sample system here, receive from the web frontend and make it human readable.

Please feel free to drop by http://xxxxx (currently not available, apologies) and try by yourself. Please note: Do not process confidential as the data is transmitted unsecured and might be stored (to improve the quality). This is NOT a commercial offering but a technology showcase. There is no warranty that the server is available or the processor correct. You can use the example message and modify it, otherwise copy and paste your own message.

The service is currently running on a Amazon EC2 micro instance, performance might decrease with a lot of traffic.

Online Telex Processor

Outlook

  • Summary for errors and rejected messages.
  • For the next versions I will add some of the other available telex types will follow such as LDM and CPM.
  • Add AFTN message interpretation.
  • Email Reply (send an email to the service and the human readable version is emailed back to the user).

IATA Telex Types Definition


Updates about the online telex processor here

Last update of the list: 2018-08-12

Working in the airport IT industry you are always challenged with integration tasks at each airport. Usually you face a heterogeneous landscape of home-brew or taylored solutions and standard software running on anything from mainframe to virtual instances in a private clouds. Using an ESB we can tackle a lot of interfacing work and focus on the data integration part. One interface that you will find on all airports that operate commercial flights, is a link to the SITA network to send and receive IATA Telexes.

It is hard to find any information online, so I summarised the available message types here. Btw, these telex types are often referred to as SITA Telex types, which is not correct, IATA (Air Transport Association) defines the available telex types and SITA is operating the network to distribute the messages between airlines, airports, ATC, groundhandling agents and other relevant members of the airport community.

This list should be almost complete, giving you the type, the description and the AHM (Airport Handling Manual) or RP (Recommended Practice) reference. The AHM that you can purchase from IATA gives you all the syntax and details for most of the available types.

Find more info about baggage messaging here: IATA Type B Bag Messages and Baggage Messaging Refresher


MVT AIRCRAFT MOVEMENT MESSAGE IATA AHM 780
LDM LOAD MESSAGE IATA AHM 583
PTM PASSENGER TRANSFER MESSAGE IATA RP 1718
PSM PASSENGER SERVICE MESSAGE IATA RP 1715
DIV AIRCRAFT DIVERSION MESSAGE IATA AHM 781
BSM BAGGAGE SERVICE MESSAGES IATA RP 1745
CPM CONTAINER/PALLET DISTRIBUTION MESSAGE IATA AHM 587
UCM ULD CONTROL MESSAGE IATA AHM 388
SCM ULD STOCK CHECK MESSAGE IATA AHM 385
SLS STATISTICAL LOAD SUMMARY IATA AHM 588
ASM ADHOC SCHEDULED MESSAGE IATA AHM 785
PAL PASSENGER ASSISTANCE LIST IATA RP1707b, 1708
LPM LOAD PLANNING MESSAGE IATA AHM 580
ALI ABBREVIATED LOAD INFORMATION MESSAGE IATA AHM 584
SOM SEATS OCCUPIED MESSAGE IATA RP 1712
SPM SEATS PROTECTED MESSAGE IATA RP 1711
PIL PASSENGER INFORMATION LIST IATA RP 1716
TPM TELETYPE PASSENGER MANIFEST IATA RP 1717
RQL REQUEST LIST MESSAGE IATA RP 1709
PNL PASSENGER NAME LIST IATA RP 1708
PRL PASSENGER RECONCILE LIST IATA RP 1719b
PNL FREQUENT TRAVELLER LIST IATA RP 1719a
PFS PASSENGER FINAL SALES MESSAGE IATA RP 1719
IDM INDUSTRY DISCOUNT MESSAGE IATA RP 1714
ASL ADDITIONS AND DELETIONS LIST IATA RP 1708
SAL SEATS AVAILABLE LIST IATA RP 1713
RQM REQUEST INFORMATION MESSAGE IATA AHM 783
UWS ULD/BULK LOAD WEIGHT SIGNAL IATA AHM 581
FMM FUEL MONITORING MESSAGE IATA AHM 782

Disclaimer: The list might not be correct or complete. It is for educational purpose only. For reliable information please refer to the IATA manuals.

MVT, LDM, PTM, TPM, CPM, PSM, UCM are among the most common telexes from my experience. If you implement a telex interpreter you definitely need to implement these types first.

Drools Fusion Samples

I want to share some more tips and more realistic data and rules scenarios.

  • Netbeans: If you run the java file (Run File)with the sample code instead of running the whole application, the resources and NOT rebuild, means any changes made to the rules would not be reflected. So rither Cleand and Build or run the application then resources are rebuild automatically.
  • Threads: In the first sample we did not use a separate thread to fire the rules. If you update or insert facts after the initial ksession.fireAllRules() you will not see any output from the engine, only if you call it again. I recommend the thread approach with ksession.fireUntilHalt()as shown in the last tutorial.
  • Container: A simple java application might be good enough for the first steps, but more realistic is the execution in a web application running in a container. I will post a separate tutorial how to run the rule engine inside a singleton EJB on Glassfish.

Rule samples and code snippets:  Managing Flights and Times
The previous samples with message instances are not close to anything realistic, so I create a little airport scenario. It wont be able to run an airport’s operations but gives an idea. I skip the basic initialization etc. We will use the pseudo clock.

  • We operate an airport with arriving and departing flights.
  • Our simplified data model
    Flights with attributes: Flightnumber, airlinecode, aircrafttype, origin, destination, number of pax.  + internal primary key
    Flight times with attributes:   Timestamp, type. + foreign key to Flights
  • Arriving flights usually have this or similar sequence of events: Scheduled Time (STOA) – Estimated (ETOA) – Landed/Touchdown (LAND) – OnBlock Time (ONBL)
    (in real operations you will have more events, also from different sources)
  • Rule 1: Alert me if the ETOA (often coming from automated interfaces like ATC or IATA Telex messages from the origin airport of the flight) is more than 30min after scheduled arrival time  STOA (maybe to inform public at the airport)
  • Rule 2: Alert me if the time between LAND and ONBL is more than 5min.
  • The rule does not make much operational sense, because you want to warn someone that the aircraft is still not at the position after minutes on the ground, means it is still taxiing and you want to inform the ground crew about it
    Rule 2b: Alert me if there is no ONBL 5min after the LAND event.
  • The Flight class
    public class Flight {
    
        private String flightKey;
        private String flightNumber;
        private String airline2lc;
        private String origin;
        private String destination;
        ... more attributes, getter-setter etc.
    }
    
  • The Flight Time class
    public class FlightTime {
    
        private Date flighttime;
        private long flighttimestamp;
        private String type;
        private String flightkey;
        ... constructor,getter-setter etc.
    }
    
  • For the simple comparison of times (Rule 1 and 2) we can ignore the session clock and use this simple rule
    rule "RULE 5"
    when
        time1:FlightTime(key:flightkey,type=='STOA') from entry-point entryone
        time2:FlightTime(flightkey == key, type=='ETOA', this after[ 30m ] time1) from entry-point entryone
    then
        System.out.println("More than 30min between STOA and ETOA: " + time1.getFlightkey() );
    end
    

    Insert facts (flight times), rules get fired by the separate thread (see previous sample)

    ..
    entrypoint1.insert(new FlightTime(new SimpleDateFormat("MM/dd/yy HH:mm").parse("03/08/12 12:00"), "STOA", "1"));
    entrypoint1.insert(new FlightTime(new SimpleDateFormat("MM/dd/yy HH:mm").parse("03/08/12 12:40"), "ETOA", "1"));
    ..
    
  • For Rule 2b we need to use the session clock
    rule "RULE 6"
    when
        time1:FlightTime(key:flightkey,type=='LAND') from entry-point entryone
        not (
            FlightTime(flightkey == key, type=='ONBL', this after[ 0,5m ] time1) from entry-point entryone
            )
    then
        System.out.println("Missing ONBL after 5min LAND: " + time1.getFlightkey() );
        System.out.println("Session Time at rule trigger: " + (drools.getWorkingMemory().getSessionClock().getCurrentTime())/60000);
    end
    

    Note: We cant use the separate thread like previously, but we must fire ksession.fireAllRules(); everytime we advance the clock !

         SessionPseudoClock clock = ksession.getSessionClock();
    
         clock.advanceTime(2, TimeUnit.MINUTES);
         entryPoint1.insert(new FlightTime((clock.getCurrentTime()), "LAND", "1"));
    
         clock.advanceTime(10, TimeUnit.MINUTES);
    
         ksession.fireAllRules();
         ..
    
  • Run with Rule 2b

    Missing ONBL after 5min

  • Challenge for now: The engine looks at the timestamp of fact insertion, so I cant backdate my timestamps, which would be necessary if you get delayed updates from an interface.
    Eg. at 02:00 you get LAND with timestamp 01:00 you would expect the rule to be triggered at 06:00 (01:00 + 5min) but it gets triggered at 07:00
    Will explore Fusion further to cover this situation.

Gettings started with JBoss jBPM5

In my journey through all the modules of Drools (Expert, Fusion, Planner), I also visit jBPM (fomerly known as Drools Flow). In this tutorial we just get started with Netbeans and a simple hello world project and focusing on the basics, such as required libraries and running within the Netbeans IDE.
Netbeans is not as close to the BPM community as Eclipse, there is no plugin available, the SOA project is abandoned (I guess). But using Netbeans as our IDE, I will not move over to Eclipse, but see how I can run and debug with Netbeans but still use some Eclipse features.

About BPMN:

The JBoss engine execute BPMN files, we can create this files manually or using one of the visual tools. For the basic understanding you should create a simple BPMN by hand to learn a bit about the notation.

Lets create the most simple BPM flow possible:

Pre-Requisites:

Continue reading

Getting started with Drools Fusion

JBoss Drools is more than Expert and Guvnor only, the suite of products also offers Fusion, Planner and Flow (now called jBPM). After getting my hands with dirty with Expert, I want to look at the Fusion part, which covers the event handling. Based on CEP (Complex Event Processing) as an event-driven architecture which is an own science by itself, whole books written about nothing else than events (link).

There is not much information on the web about Fusion other than the JBoss documentation, some chapters in Books (Packt Publishing: Drools 5 Developer Guide, Drools Cookbook) and a handful of blog entries (link), practically no working samples or end-to-end tutorials.

In this tutorial we will apply the necessary changes to our HelloDrools project from the previous tutorial:

  • The good thing: We dont need any other libraries than the ones already used.
  • Copy the previous project and give it a new name ‘HelloDroolsFusion’
  • In the last tutorial we had a simple message class and inserted a message as fact. A rule was triggered when the message type is equal to ‘Hello’
  • As refresher: The first rule
    import hellodrools.Message
    rule "Hello World"
    when
        message:Message (type=="Hello")
    then
        System.out.println("Hello World, Drools!");
    end
    

    Continue reading

Debugging Drools Rules

At the ‘hello world’ level we cant see much need to debug our rules, but with growing complexity we will be challenged quickly. We need to see which rules was fired, what parameter, what object, etc. Eclipse IDE users have the advantage of the plugin which even visualizes the RETE tree, for the rest-of-us, aka Netbeans user, we need to rely on the debugging output available. We have 4 options that give us access to almost all information of interest.

To try the below debugging options, use the previous HelloDrools Tutorial

1. Default Debug Listener

Out-of-the-box we can use 2 debug event listener:

        ...
        ksession = kbase.newStatefulKnowledgeSession();

        ksession.addEventListener( new DebugAgendaEventListener() );
        ksession.addEventListener( new DebugWorkingMemoryEventListener() );
        ...

Continue reading

d3.js Tree: most simple sample

Learning d3.js might not be as easy as some other tools because there are no step-by-step instructions to get started on a hello-world level. The samples on the d3.js site are bit too complex for a noob. But browsing through the example folder of the d3.js download helps, and usually you learn most dissecting by re-assembling sample code from other people. Another great source is gist.github.com, a code snippet repository. Look for d3.js ! With bl.ocks.org you can even “run” the snippets.

The treeview is a classic visualization but one of my favorites, specifically if you spice it up with interaction and allow the user to dive into a subtree of his choice. But what is the most simple tree layout ? I want to understand the physics behind it. So let me share my compiled (of different samples) most simple version without any fancy features or interaction.

Simlpe Tree Layout

Here my bl.ocks.org version with code or here to copy and paste:

Continue reading