Blockchain – Big Topic broken down to pieces Part 2 (Bag Custody Sample)

bccloud3

I will continue the exploration of the basic components of the blockchain technology started in the previous post, where I implemented a basic java class to visualize hashing and the linking of blocks (chain). To provide a sample for the aviation industry walking along the use-case of tracking the baggage custody changes during a flight journey .

3. Validation

A blockchain need to be validated otherwise we would not know if data was changed or corrupted. We have to iterate through the sequence of blocks, for this we create an array of bag transactions to allow easy iteration and compare the stored hash of each block with the recalculated hash. If the values match the blockchain is valid, if not it is corrupted (and all subsequent blocks). Ideally this would be event-driven, any change to the blockchain triggers the revalidation. In a real-world implementation changes through the endpoints would not be possible, something we will look at later when working with Corda or Ethereum.

		String currentBagBlockHash = "0";

		String myBagTag = randomBagTagID();
		String myPNR = randomPNR();

		ArrayList allBagTransactions = new ArrayList();
		BagTransaction tempBagTransaction = null;

		// Print Bag Tag (Genesis Block)
		tempBagTransaction = new BagTransaction(myBagTag, myPNR, Entity.NIL.name(), Entity.PAX.name(), 0, "0");
		currentBagBlockHash = tempBagTransaction.getHash();
		allBagTransactions.add(tempBagTransaction);

...

public void checkBlockchainIntegrity(ArrayList allBagTransactions) {
	// Check Blockchain. Compare recalculated hash with hash attribute stored

	for (BagTransaction b : allBagTransactions){
		System.out.print("Block " + b.getBlockID() + " Stored Hash: " + b.getHash() + " -- Calculated Hash:" + b.createHash());
		if (b.getHash().equals(b.createHash()))
			System.out.println(" -- OK");
		else
			System.out.println(" -- FAIL. Blockchain broken.");
	}
	System.out.println(" -- ");
}
	}

For better reading we convert each block into a JSON object.

{
  "timeStamp": "2018-08-26T09:18:09.227Z",
  "blockID": 0,
  "blockHash": "ce41abbf21a162152e30fc511eaf594db43c84948691d12ef78fad6f31fa6043",
  "previousBlockHash": "0",
  "bagTag": "5347241966",
  "pnr": "EONT9T",
  "custodyTransfer": [
    {"transferFrom": "NIL"},
    {"transferTo": "PAX"}
  ]
}
{
  "timeStamp": "2018-08-26T09:18:09.287Z",
  "blockID": 1,
  "blockHash": "6b6073122ef996acc1e3c3e74c3963b5903112800781b4ba88e96baf0a8e2e04",
  "previousBlockHash": "ce41abbf21a162152e30fc511eaf594db43c84948691d12ef78fad6f31fa6043",
  "bagTag": "5347241966",
  "pnr": "EONT9T",
  "custodyTransfer": [
    {"transferFrom": "PAX"},
    {"transferTo": "AIRP"}
  ]
}

Running the validation for a clean and corrupted blockchain

Block 0 Stored Hash: ce41abbf21a162152e30fc511eaf594db43c84948691d12ef78fad6f31fa6043 -- Calculated Hash:ce41abbf21a162152e30fc511eaf594db43c84948691d12ef78fad6f31fa6043 -- OK
Block 1 Stored Hash: 6b6073122ef996acc1e3c3e74c3963b5903112800781b4ba88e96baf0a8e2e04 -- Calculated Hash:6b6073122ef996acc1e3c3e74c3963b5903112800781b4ba88e96baf0a8e2e04 -- OK
Block 2 Stored Hash: a33bbb5ebdec589e9f1b7c7952d6fef3fae2235b5a0600b8755b07040bba8227 -- Calculated Hash:a33bbb5ebdec589e9f1b7c7952d6fef3fae2235b5a0600b8755b07040bba8227 -- OK
Block 2 Stored Hash: 464319fed3a2c49df9a1fbeedae3f3e7c6692db0f6ab97a4c983f9fdf4269e6d -- Calculated Hash:464319fed3a2c49df9a1fbeedae3f3e7c6692db0f6ab97a4c983f9fdf4269e6d -- OK
-- Now corrupt Block 1 by changing the data
Block 0 Stored Hash: ce41abbf21a162152e30fc511eaf594db43c84948691d12ef78fad6f31fa6043 -- Calculated Hash:ce41abbf21a162152e30fc511eaf594db43c84948691d12ef78fad6f31fa6043 -- OK
Block 1 Stored Hash: 6b6073122ef996acc1e3c3e74c3963b5903112800781b4ba88e96baf0a8e2e04 -- Calculated Hash:09fd4223571f079258bd69d935f99cb552cd3ac0854410b81a2313d215929ebd -- FAIL. Blockchain broken.


4. Mining Blocks

Now we get to the first more complex concepts of the blockchain, the mining process. We are still operating at a very basic level though with a single node, but we can introduce the mining operation. Without going into too much detail, mining blocks is the step to close/hash a block and creating a new one as part of the consensus process. The incentive to the miner community is a transaction fee given to that miner that solves a hard cryptographic problem first. The more computing power you invested in, the higher chance you have as miner to solve the problem and get the fee. Based on scarcity this consensus approach is called Proof-of-Work (recommended reading). Unfortunately this lead to the current hardware race consuming vast amount of energy for literally no purpose (you let CPU/GPU’s guess numbers basically). This is seen as limitation, together with the long transaction times, and some blockchain start to move to other concepts, such as Proof-of-Stake.

Breaking down the Proof-of-Work to a simple algorithm, we build a hash function that need to create a certain pattern before being accepted. The hash of (data current block + hash previous block + a nonce value) need to have a number of leading “0” in front. The number of “0” is the difficulty and the nonce is an integer value that is changed/increased until the hash matches the required pattern.

public String mineHash(int difficulty) {
	String returnHash = "";
	String tempHash = "";

	String target = new String(new char[difficulty]).replace('\0', '0');
	tempHash = createHash();

	while (!tempHash.substring(0, difficulty).equals(target)) {
		nonce++;
		tempHash = createHash();
	}

	return tempHash;
}

With a growing difficulty (more leading “0”) it takes obviously longer to crack the challenge and with more CPU power you can run through the guessing cycle faster. Some samples below with increasing difficulty running on an ordinary notebook i7 CPU (java executing on a single core/thread in this case).

Difficulty: 1
Attempts: 11
Milliseconds: 10

Difficulty: 2
Attempts: 393
Milliseconds: 30

Difficulty: 3
Attempts: 1.794
Milliseconds: 40

Difficulty: 4
Attempts: 115.756
Milliseconds: 230

Difficulty: 5
Attempts: 3.366.041
Milliseconds: 3.210

Difficulty: 6
Attempts: 5.322.279
Milliseconds: 4.530

Difficulty: 7
Attempts: 76.339.743
Milliseconds: 60.850

Block
{
  "timeStamp": "2018-08-26T10:38:36.734Z",
  "blockID": 0,
  "blockHash": "0000000158d606c953a5df346d459aad949e9dbb4abe74f30ecf225c23112b14",
  "previousBlockHash": "0",
  "bagTag": "7821666095",
  "pnr": "ZHY4RT",
  "custodyTransfer": [
    {"transferFrom": "NIL"},
    {"transferTo": "PAX"}
  ]
}

Have a look at the below website for the current real life difficulty for bitcoin (hashing algorithm not implemented in the simple way we did it here for illustration purpose). Looking at the current difficulty (6,727,225,469,722) you can guess what kind of hardware setup you need to be fast. I gave up beyond difficulty 7 with the algorithm above.

Bitcoin Difficulty

Stay tuned for more blockchain.

Disclaimer: This discussion, datamodel and sourcecode or application is for study purpose solely. It does not reflect or replicate any existing commercial product.

Sourcecode at github

Blockchain – Big Topic broken down to pieces

bccloud2

Blockchain is certainly not the latest buzzword any longer, it moved well forward on the Gartner Hype Cycle, passed the peak of inflated expectations and I am sure we will find it in the trough of disillusionment in the soon to be updated 2018 version. It is picked up by various industries looking for use-cases and applications. Unfortunately we are looking at Blockchain fatigue already, as there is much hype but little visible implementations outside the cryptocurrency space. I prefer projects that implement blockchain as the right tool for a particular problem over the “let’s see which business case we can throw blockchain at” approach.

In the aviation (airport) space I believe Blockchain has its appliance, but as previously stated I wont attempt to build an AODB with Blockchain as “database” for milestones just for the sake of integrating this technology. For some scenarios you certainly need immutability of data, but we can implement this with the means of other immutable data storage. It is also no point implementing a blockchain into a corporate network infrastructure with few nodes under the control of one entity, this does not fulfill the promise of distributed ledger and trust. A few use-cases that I see, usually involving multiple business parties:

  • Baggage tracking from end-to-end (goes well with IATA 753 effective since June 1st)
  • Service and contract management, billing (eg. groundhandler-airline)
  • Aircraft spare parts management (here the track of provenance have a huge impact)

Trying to understand blockchain can be overwhelming, ranging from Satoshi Nakamoto’s original whitepaper to a endless number of books, talks, websites.
One approach to understand the technology is to break it down into smaller pieces that are implementing proven existing technology or algorithms and understand how they come together eventually forming the much more complex blockchain.

I wont attempt to explain blockchain here, this is redundant, plenty of knowledgeable people have written books and articles you can refer to, but split it into some basic easy digestible portions, some coding included. Before attempting to code against real blockchain implementations, like Ethereum or Hyperledger, I will implement the most basic and simple blockchain first.

1. Hash

The most essential element of blockchain is a hash, a digital signature. A hash is a one way encryption,  once something is hashed there is no way to reverse the process and reveal the original text (decrypt it). Using the SHA (Secure Hash Algorithm), the most popular algorithm with its variants of 256, 384 and 512 bit, defined by NIST, we can convert a text (data) of any length to a 256 bit representation (for SHA256) which is represented by a 64 byte hex string. There is a number of libraries implementing the algorithm, below is the Apache DigestUtils version.

	private void testSHA(){

		String sha256hex = DigestUtils.sha256Hex("Jim Smith");
		System.out.println("\n1 SHA256: " + sha256hex);

		String sha256hex2 = DigestUtils.sha256Hex("jim smith");
		System.out.println("\n2 SHA256: " + sha256hex2);

		String sha256hex3 = DigestUtils.sha256Hex("jim smith and the lazy brown fox");
		System.out.println("\n3 SHA256: " + sha256hex3);

		String sha384hex = DigestUtils.sha384Hex("Jim Smith");
		System.out.println("\n4 SHA384: " + sha384hex);

		String sha512hex = DigestUtils.sha512Hex("Jim Smith");
		System.out.println("\n5 SHA512: " + sha512hex);
	}

resulting in

1 SHA256: 65742910cc03889474f1ee2c8f321a105603d0ae2f91070ffd95b35f8da88261
2 SHA256: bfae13266154ec3c4de5c09cf14358305e44f48d2156953723ebbb184a724499
3 SHA256: e5a4a1b8bd88eb7cf8bff9ee5dd235f87ef996262d4d0213c1387f6141ab9574
4 SHA384: c6e76ad773905c1eedb6a0bd9c0b1602a56928d1ce95d70190cd908797466b948dd342aa69dd0343251afece2e48bfc2
5 SHA512: f813c3d9deb66d4999f6839acc60eb6e2fff6a84266c02e0d4b183f5e56d9674c70b0b136f9e1388673cefbc9278f583e3a4c9803ef0c49f9af28aca60dae5ac

Important to notice:
– Change of one character in the original text produces a complete new hash.
– Independent from the length of the original text the hash has the same length.

2. Chained blocks

As the wording implies, there are blocks of information that are linked together. Sounds like a linked list, where every list entry is pointing to the next information. The chained blocks are linked differently, every block points to the hashed previous block.

For illustration I choose a typical baggage journey (simplified).

blockchain

A bag passes different key touchpoints and changes its custody a few times between the various parties during the handling. Every time there is a new milestone event we record it, eg. bag scanned by groundhandler at the chute at what time, and include the hash of the previous milestone. This way the lifecycle from bag drop at departure to bag delivery at destination is recorded in an immutable way and cannot be changed afterwards.

Pitfall: The bag journey is recorded in an immutable way, but the blockchain cannot verify or confirm the milestone actually happened. This falls into the responsibility of the overall design and service orchestration.

Let’s build a very simple application implementing the above blockchain for baggage handling.

A java class BagTransaction representing the bag attributes inclusive timestamp and the custody transfer.

package blockchaindemo;

import java.time.Instant;

import org.apache.commons.codec.digest.DigestUtils;

public class BagTransaction {

	private String bagTag;
	private String timeStamp;
	private String pnr;
	private String transferFrom;
	private String transferTo;

	private long blockID;
	private String blockHash;
	private String previousBlockHash;

	public BagTransaction(String bagTag, String pnr, String transferFrom, String transferTo, long blockID,
			String previousBlockHash) {
		super();
		this.bagTag = bagTag;
		this.timeStamp = Instant.now().toString();
		this.pnr = pnr;
		this.transferFrom = transferFrom;
		this.transferTo = transferTo;
		this.blockID = blockID;
		this.previousBlockHash = previousBlockHash;

		this.blockHash = createCurrentHash();
	}

	public String getHash() {
		return this.blockHash;
	}

	@Override
	public String toString() {
		return "BagTransaction [bagTag=" + bagTag + ", timeStamp=" + timeStamp + ", pnr=" + pnr + ", transferFrom="
				+ transferFrom + ", transferTo=" + transferTo + ", blockID=" + blockID + ", blockHash=" + blockHash
				+ ", previousBlockHash=" + previousBlockHash + "]";
	}

	private String createCurrentHash() {
		String returnHash = "";

		returnHash = DigestUtils.sha256Hex(
				this.bagTag + this.timeStamp + this.pnr + this.transferFrom + this.transferTo + this.previousBlockHash);

		return returnHash;
	}

}

Take note of the hashing method that includes all fields inclusive of the previous hash.

A java class BagDemoApp using the transaction class.

package blockchaindemo;

import java.util.Random;

public class BagDemoApp {

	public static void main(String[] args) {

		BagDemoApp demoApp = new BagDemoApp();
		demoApp.demo1();

	}

	public void demo1() {

		String myBagTag = randomBagTagID();
		String myPNR = randomPNR();

		String currentBagBlockHash = "";

		// Print Bag Tag (Genesis Block)
		BagTransaction bagTransaction1 = new BagTransaction(myBagTag, myPNR, Entity.NIL.name(), Entity.PAX.name(), 1,
				"0");
		currentBagBlockHash = bagTransaction1.getHash();

		// Bag Drop
		BagTransaction bagTransaction2 = new BagTransaction(myBagTag, myPNR, Entity.PAX.name(), Entity.AIRP.name(), 2,
				currentBagBlockHash);
		currentBagBlockHash = bagTransaction2.getHash();

		// Bag SEC Scan
		BagTransaction bagTransaction3 = new BagTransaction(myBagTag, myPNR, Entity.AIRP.name(), Entity.SEC.name(), 3,
				currentBagBlockHash);
		currentBagBlockHash = bagTransaction3.getHash();

		// Display Transactions
		System.out.println(bagTransaction1);
		System.out.println(bagTransaction2);
		System.out.println(bagTransaction3);

	}

	// HELPER METHODS --------------------------------------------

	public String randomPNR() {
		final String alphabet = "0123456789ABCDEFGHIJKLMNOPQRSTUVWXYZ";
		final int N = alphabet.length();

		Random r = new Random();
		StringBuffer tempPNR = new StringBuffer();

		for (int i = 0; i < 6; i++) {
			char nxtChar = alphabet.charAt(r.nextInt(N));
			while ((i == 0) && (Character.isDigit(nxtChar)))
				nxtChar = alphabet.charAt(r.nextInt(N));
			tempPNR.append(nxtChar);
		}
		return tempPNR.toString();
	}

	public String randomBagTagID() {
		String tempBagTag = "";

		long range = 9999999999L;
		Random r = new Random();
		long number = (long) (r.nextDouble() * range);

		tempBagTag = String.format("%010d", number);
		return tempBagTag;
	}

	public enum Entity {

		PAX {
			@Override
			public String toString() {
				return "Passenger";
			}
		},
		GH {
			@Override
			public String toString() {
				return "Groundhandler";
			}
		},
		AIRL {
			@Override
			public String toString() {
				return "Airline";
			}
		},
		AIRP {
			@Override
			public String toString() {
				return "Airport";
			}
		},
		SEC {
			@Override
			public String toString() {
				return "Security";
			}
		},
		NIL {
			@Override
			public String toString() {
				return "nil";
			}
		}

	}

}

Executing the application

BagTransaction [bagTag=1691462171, timeStamp=2018-08-12T08:02:25.745Z, pnr=ICSEAH, transferFrom=NIL, transferTo=PAX, blockID=1, blockHash=3ff736f7158d224db6e2e8ba25f3d50321903cd911646576f442a60f8c5872ed, previousBlockHash=0]
BagTransaction [bagTag=1691462171, timeStamp=2018-08-12T08:02:25.808Z, pnr=ICSEAH, transferFrom=PAX, transferTo=AIRP, blockID=2, blockHash=88dd4a2be3bc90ebce71635bedd6bcb63b326044e4bd49634a859a86458de243, previousBlockHash=3ff736f7158d224db6e2e8ba25f3d50321903cd911646576f442a60f8c5872ed]
BagTransaction [bagTag=1691462171, timeStamp=2018-08-12T08:02:25.808Z, pnr=ICSEAH, transferFrom=AIRP, transferTo=SEC, blockID=3, blockHash=ea7767ddb2dd7c2bfed4d3a038b9249e43df15a0396ff71da717783db9fee3c4, previousBlockHash=88dd4a2be3bc90ebce71635bedd6bcb63b326044e4bd49634a859a86458de243]

Please note, this is the most simple implementation of a blockchain for illustration purpose, it still misses a lot of features to pass to production, eg. mining, proof-of-work, etc.

In a second part might spin this a bit further. Stay tuned.


Disclaimer: This discussion, datamodel and sourcecode or application is for study purpose solely. It does not reflect or replicate any existing commercial product.

Build an Async Restful Webservice Client in Android in 5min and read BA flight data

In an earlier blog post we build a Restful WS running on Wildfly, now lets build the client part for Android. Thanks to the okHttp, an Apache 2.0 licensed java and Android library, this becomes a very easy challenge. In a mobile application we definitely want to implement a async call as we cannot rely on the response time being fast and a blocked application is not a pleasant user experience.

To make it a bit more interesting for the aviation context of my blog, we will take a real airline webservice and show operational flight data  in the second step.

Step 1: The Basic Webservice Client

Lets get started, I skip the project creation steps, you can create any basic empty Android application.

Add the dependency

..
dependencies {
    compile fileTree(include: ['*.jar'], dir: 'libs')
    androidTestCompile('com.android.support.test.espresso:espresso-core:2.2.2', {
        exclude group: 'com.android.support', module: 'support-annotations'
    })
    compile 'com.android.support:appcompat-v7:24.1.1'
    testCompile 'junit:junit:4.12'
compile 'com.squareup.okhttp3:okhttp:3.9.0'
}

Implement the WS call with a call back

(we use the serverside we implemented previously with 2 parameters)

    private void testOKHttp() {

        OkHttpClient httpClient = new OkHttpClient();
        String callURL = "http://www.yourservername.com/DemoRandomizer/randomservice/random/numberrange";

        HttpUrl.Builder urlBuilder = HttpUrl.parse(callURL).newBuilder();
        urlBuilder.addQueryParameter("min", "10");
        urlBuilder.addQueryParameter("max", "100");
        callURL = urlBuilder.build().toString();

        Request request = new Request.Builder().url(callURL).build();
        httpClient.newCall(request).enqueue(new Callback() {

            @Override
            public void onFailure(Call call, IOException e) {
                System.out.println(e.getMessage());
            }
            @Override
            public void onResponse(Call call, Response response) throws IOException {
                ResponseBody responseBody = response.body();
                if (!response.isSuccessful()) {
                    throw new IOException("Error response " + response);
                } else {
                    String str = new String(responseBody.bytes());
                    System.out.println(str);
                }
            }
        });

    }

It is good practice to block UI features (buttons, etc) that rely on the WS response or use a progress dialogm which is in some way blocking but the user is aware of the ongoing request.


// Set progress dialog befor the call
        prgDialog = new ProgressDialog(this);
        prgDialog.setMessage("Please wait...");
        prgDialog.setCancelable(false);
        prgDialog.show();

// remove the call after successful response or error
        prgDialog.dismiss();

Step 2: Client to read British Airways data

device-2017-10-14-092750

Lets gets our hand on some real data and tap into one of the open API’s offered by some airlines and airports, though I have to say that only very few players offer their data for public consumption. I will list some API’s in another blog post. Today we will make use of the British Airways API running on the Tibco Mashery platform. BA offers a variety of flight related data and we look at the flight status webservice. We can use the service for evaluation purpose up to 1 call a second and 500 calls a day, good enough to play with their data. We will collect the status of outbound flights from LHR (London Heathrow) for +/- 2hours. Before jumping into sourcode I recommend using a tool to test the webservice manually, eg. the Chrome Browser Rest Web Service Client extension.

2017-10-14 09_24_58-Rest Web Service Client

Using Chrome extension to get data from BA Webservice

One of the challenges, every API offering might support JSON and XML as WS GET, but the attributes and response format is different, we have to implement for every airline or airport we want to use the data, or add some kind of mapping layer.

For the BA service we have to change to call from step 1 above because we need to add the API key that you apply for under your account, also the parameter are not handled as query parameters but as parameter matrix.

The first code block only lists the relevant parts and the complete code block below adds some extras to handle GUI access, exception handling and the parameter creation.

 private void testWSCall() {

        OkHttpClient httpClient = new OkHttpClient();
        String callURL = "https://api.ba.com/rest-v1/v1/flights;departureLocation=LHR;startTime=12:00;endTime=18:00;";

        Request request = new Request.Builder().url(callURL)
                .addHeader("Content-Type", "application/json")
                .addHeader("client-key", "YOUR_KEY_HERE")
                .build();

        httpClient.newCall(request).enqueue(new Callback() {

            @Override
            public void onFailure(Call call, IOException e) {
                System.out.println("WS Call failed (1):" + e.getMessage());
            }

            @Override
            public void onResponse(Call call, Response response) {
                ResponseBody responseBody = response.body();
                if (!response.isSuccessful()) {
                    final String errRep = "WS Call failed (2):" + response.toString();
		    System.out.println(errRep);
                } else {
                    String str = new String(responseBody.bytes());
		    System.out.println(str);
                }
            }
        });

}
 private void testOKHttp() {

        OkHttpClient httpClient = new OkHttpClient();

        DateFormat dateFormatShort = new SimpleDateFormat("HH:mm");
        Date date = new Date();
        long timeNow = date.getTime();
        long timePlus = timeNow + 120 * 60 * 1000;
        long timeMinus = timeNow - 120 * 60 * 1000;
        Date datePlus = new Date(timePlus);
        Date dateMinus = new Date(timeMinus);

        String callURL = "https://api.ba.com/rest-v1/v1/flights;departureLocation=LHR;startTime=" + dateFormatShort.format(dateMinus) +";endTime=" + dateFormatShort.format(datePlus) +";";
        System.out.println(callURL);

        Request request = new Request.Builder().url(callURL)
                .addHeader("Content-Type", "application/json")
                .addHeader("client-key", "YOUR_KEY_HERE<span 				data-mce-type="bookmark" 				id="mce_SELREST_start" 				data-mce-style="overflow:hidden;line-height:0" 				style="overflow:hidden;line-height:0" 			></span>")
                .build();

        httpClient.newCall(request).enqueue(new Callback() {

            @Override
            public void onFailure(Call call, IOException e) {
                System.out.println("WS Call failed (1):" + e.getMessage());
                prgDialog.dismiss();
            }

            @Override
            public void onResponse(Call call, Response response) {
                ResponseBody responseBody = response.body();
                if (!response.isSuccessful()) {
                    final String errRep = "WS Call failed (2):" + response.toString();
                    mHandler.post(new Runnable() {
                        @Override
                        public void run() {
                            editTextResult.setText(errRep);
                        }
                    });
                    prgDialog.dismiss();
                } else {
                    try {
                        System.out.println("Response " + response.toString());
                        String str = new String(responseBody.bytes());
                        prgDialog.dismiss();

                        final JSONObject svcresponse = new JSONObject(str);
                        int spacesToIndentEachLevel = 2;
                        final String prettyPrintString = svcresponse.toString(spacesToIndentEachLevel);
                        mHandler.post(new Runnable() {
                            @Override
                            public void run() {
                                editTextResult.setText(prettyPrintString);
                            }
                        });

                    } catch (Exception e) {
                        e.printStackTrace();
                        final String errStr = e.getMessage();
                        mHandler.post(new Runnable() {
                            @Override
                            public void run() {
                                editTextResult.setText(errStr);
                            }
                        });
                        prgDialog.dismiss();
                    }
                }
            }
        });

    }

Read My Boarding Pass App

In the previous blog post I discussed the underlying standards of the BCBP (Bar Coded Boarding Pass) following IATA Reso 792. Today I will built an Android mobile app that scans the PDF417 barcode and shows the raw content as well the decoded fields.

The are 3 main challenges for building the app, scanning/reading the barcode and decoding the text to individual attributes and as last, not to use any internet connection (to assure the user the users privacy and avoid any potential identity theft discussions)

As we build a native Android app we can rely on third party libraries to scan and decode barcodes. There is a number of commercial libraries in the market, but as I build a free app I will use the zxing-android-embedded library, which is a port of the ZXing (“Zebra Crossing”) barcode scanning library for Android with added embedding features, ZXing only provides the decoding logic. Both are licensed under Apache 2.0, ZXing can decode all the common types, such as EAN-8, EAN-13, UPC, ITF, PDF417, QRCode, Aztec, Data Matrix and a few more.

Integration Barcode Library ZXing

With the library the integration becomes as simple as adding a few lines of code only.

Add the dependency to the build gradle file

dependencies {
    compile fileTree(dir: 'libs', include: ['*.jar'])
    androidTestCompile('com.android.support.test.espresso:espresso-core:2.2.2', {
        exclude group: 'com.android.support', module: 'support-annotations'
    })
    compile 'com.android.support:appcompat-v7:25.3.1'
    compile 'com.android.support.constraint:constraint-layout:1.0.2'
    testCompile 'junit:junit:4.12'

    compile 'com.journeyapps:zxing-android-embedded:3.5.0'
}

Trigger the scan and read the result

public void scanCode(View view){
        new IntentIntegrator(this).initiateScan();
    }

    @Override
    protected void onActivityResult(int requestCode, int resultCode, Intent data) {
        IntentResult result = IntentIntegrator.parseActivityResult(requestCode, resultCode, data);
        if(result != null) {
            if(result.getContents() == null) {
                System.out.println("Scan failed or cancelled.");
            } else {
                System.out.println(result.getContents());
            }
        } else {
            super.onActivityResult(requestCode, resultCode, data);
        }
    }

For now, the app (“ReadMyBoP – Read My Boarding Pass”) does nothing but scan the barcode, identify if it is a valid boarding pass barcode, display the raw content and makes the content more human-readable. You can download from Google Playstore. It works with Android 4.1 and above.
There is one extra feature for now, it decodes the IATA fare codes (First, business, economy classes and the various discounted codes, it follows IATA Reso 728 if you want to look for the complete codeset.

Decoding the Raw Text

Given the fact, this is a fixed-length field text, it is no big deal to split the relevant info by substring’ing it using the decoding table that we started in the previous post. As basic validation we can use the mandatory “M” on position 1 and a length of not less than 59 characters (mandatory fields).

# Element Mandatory Size Sample Remark
1 Format Code M 1 M Always “M”
2 Number of legs encoded M 1
3 Passenger Name M 20
4 Electronic Ticket Indicator M 2 E
5 Operating carrier PNR Code M 7
6 Origin IATA Code M 3 FRA Airport Code
7 Destination IATA Code M 3 SIN Airport Code
8 Operating carrier IATA Code M 3 LH Airline
9 Flight Number M 5 3456
10 Date of Flight M 3 280 Julian Date
11 Compartment Code M 1 B First, Business, Economy
12 Seat Number M 4 25A
13 Check-in Sequence Number M 5 0012
14 Passenger Status M 1 00
15 Size of optional Block M 2 5D hexadecimal
16 Start Version Number 1 > Always “>”
17 Version Number 1 5
18 Field Size of follow ing structured message 2
19 Passenger Description 1
20 Source of check-in 1
21 Source of Boarding Pass Issuance 1
22 Date of Issue of Boarding Pass (Julian Date) 4
23 Document Type 1
24 Airline Designator of boarding pass issuer 3
25 Baggage Tag Licence Plate Number 1 13
26 Baggage Tag Licence Plate Number 2 13
27 Baggage Tag Licence Plate Number 3 13
28 Field Size of follow ing structured message 2
29 Airline Numeric Code 3
30 Document Form/Serial Number 10

Is there a roadmap ? For sure, if I find the time I will add the optional fields, an airline and airport code dictionary (must check the size of a local sqllite db if we want to stay offline). Maybe add baggage tag reader feature and local barcode image storage for boarding. Stay tuned !

readmybop1.2

Application Disclaimer: The application is for educational and research purpose. It is provided as-is, no warranty included. It does not transmit data over the internet and does not store any data upon exiting the app.

What’s in my boarding pass barcode ?

Since more than 10 years passengers are used to the barcode imprinted on the traditional ticket boarding pass slip, the home printed boarding pass or the boarding pass displayed in the mobile app provided by the airline. To be more precise the 2004 IATA Passenger Service Conference approved Resolution 792 setting the BCBP (Bar Coded Boarding Pass) standard as part of the STB (Simplify The Business) program.

The barcode simplifies passenger handling as the barcode can be read automatically by barcode readers along the passenger journey for bag-drop, security check area access and boarding. It significantly reduces the error rate to the time before barcode and eventually saved millions of Euros/Dollars due to mishandling and delays. Today we see self-boarding gates that remove the need for an agent, though business and first class passenger are still welcomed by a human gate agent. Btw, the magnetic stripe on the back of the old tickets expired in 2010.

Old Passenger Ticket without barcode (Image Public Domain)

The BCBP standard defines PDF417 (public domain standard, no fees or licenses) as the barcode symbol format as well defines the encoded content. The content in the barcode contains the same information as printed on the standard boarding pass, though some airlines omit information on the self-printed version in favor of simplicity, some extra info is optionally encoded.

2017-10-07 06_47_41-Boarding-Pass Barcode Aztec QR Generator

Sample PDF 417 barcode

M1SMITH/JOHN          EHJK345 FRASINLH 3456 280C015A0001 100

The standard covers 3 additional barcodes that are not used for printing, but used for mobile apps, these are Aztec and QR Code.

The encoding is straight foward using fix-length fields and the code can carry up to 4 legs of a journey.

Element Size Sample Remark
Format Code 1 M Always “M”
Number of legs encoded 1 1
Passenger Name 20
Electronic Ticket Indicator 2 E
Operating carrier PNR Code 7
Origin IATA Code 3 FRA Airport Code
Destination IATA Code 3 SIN Airport Code
Operating carrier IATA Code 3 LH Airline
Flight Number 5 3456
Date of Flight 3 280 Julian Date
Compartment Code 1 B First, Business, Economy
Seat Number 4 25A
Check-in Sequence Number 5 0012
Passenger Status 1 00

These are the mandatory fields, there are additional optional fields and blocks for baggage info, document info, frequent flyer number or security data.

To be noted, the IATA PADIS XML message standard shall be used for the exchange of BCBP data between systems, defined in Resolution 783 – Passenger and Airport Data Interchange Standards.

I like to add also, the printed barcode is the current common nominator for international travel, but there are initiatives on the way to simplify the passenger journey even further with newer technology such as biometric ID’s and identity management, eg. IATA OneIdentity Initiative.

In the next post we will assemble a simple Android application to read the boarding pass barcode. Stay tuned.

Disclaimer: The information provided here might not be correct or complete. It is for educational purpose only. For reliable information please refer to the IATA manuals.

Build a RESTful Webservice in less than 5 minutes

There are quite some tutorials around about building and exposing a RESTful Webservice, but some of them are outdated and make you wade through complex dependencies and tinkering with deployment descriptors and web.xml files. But using RESTeasy, the JBoss implementation that is fully compliant with the JAX-RS 2.0 JCP specification, and Eclipse you can build a simple webservice (“hello world”) with less than 10 lines of sourceode with annotations and no web.xml used in a few minutes and run it on Wildfly.

Lets build a webservice that creates random numbers.

Continue reading

Exploring a SQLite Database on Android

or “How to read SQLite DB from a desktop”

SQLite is the relational, embedded, ACID compliant database that comes with Android. Due to this fact it is certainly the most deployed DB engine on this planet. In case your application need to have CRUD features for local persisted data and the complexity level is beyond a simple text file, you have to consider it.

A challenge is to look into the (raw) DB from your desktop (if you dont want to build and integrate a DB viewer into your app). As Android apps store databases into their respective /data subfolder and if you don’t have a rooted phone, you cant look inside this folder.

I am not aware of any tool that can open a connection to the DB remotely, so the best way is to copy the DB file into the accessible SD card (or whatever the phone and its manufacturer considers as SD card, even the internal memory mounted as SD card), download it to your desktop and open it with a tool like the SQLite DB Browser.

Let’s put some sourcecode here as reference

Create a simple demo DB

No bells and whistles, no helper classes, etc. just the most simple way to create DB and a table.

 
    private void createDB() {
        SQLiteDatabase sampleDB = this.openOrCreateDatabase("MYDEMODB", MODE_PRIVATE, null);
        sampleDB.execSQL("CREATE TABLE IF NOT EXISTS MYTABLE (Last VARCHAR, First VARCHAR, Role VARCHAR);");
        sampleDB.execSQL("INSERT INTO MYTABLE Values ('Smith','John','CEO');");
        sampleDB.execSQL("INSERT INTO MYTABLE Values ('Thomson','Allan','CTO');");
        sampleDB.close();
    }

Copy the DB to your SD card

 
    private void exportDB() {
        File mySd = Environment.getExternalStorageDirectory();
        File myData = Environment.getDataDirectory();

        FileChannel src = null;
        FileChannel des = null;
        String currentDBPath = "/data/" + getApplicationContext().getPackageName() + "/databases/MYDEMODB";
        String exportDBPath = "MYDEMODB";

        File currentDB = new File(myData, currentDBPath);
        File backupDB = new File(mySd, exportDBPath);
        try {
            src = new FileInputStream(currentDB).getChannel();
            des = new FileOutputStream(backupDB).getChannel();
            des.transferFrom(src, 0, src.size());
            src.close();
            des.close();
        } catch (IOException e) {
            e.printStackTrace();
        }
    }

After download to your local drive you can use the SQLite Browser to open the file. Very useful data debugging or for apps that collect data and you can’t implement an upload of the data to a server via the internet connection.

SQLite DB Browser

SQLite DB Browser (Structure View)


SQLite DB Browser

SQLite DB Browser (Data View)

D3.js Getting started (again..)

The same questions as some years back: How to get started with it ?

The learning curve for beginners is certainly a bit steep if you dont have a basic background in at least HTML, CSS and JavaScript, in this case you rather go for a visualization tool like Tableau if you look for fast results.
The good news: There is plenty of material out there about D3, books, websites, tutorials. I purchased a couple of books from Packt Books and O’Reilly as PDF version, I think they have the most books, though most of them based on earlier D3 versions.

Packt Books

Packt Books

O'Reilly Books

O’Reilly Books

I wont recommend a specific one, most follow the same principles, a short intro to the DOM, explain the D3 basics followed by more or less complex samples. As with any other technology or programming language you learn most hands-on, there so many examples and good tutorials available. I never attempted to understand everything, understand the concepts, dissect existing visualizations and get creative !

Continue reading

d3.js – From tree to cluster and radial projection

Some visualizations seem to be more sophisticated (to implement) than they actual are, specifically the radial projections. Starting from a tree representation with nodes and links it is quite easy to get to the radial version.
Remark: Of course there are more challenging radial diagrams like the bundle, but lets get started with something simple first !

“Standard” Tree
(I added few more nodes to make the visual difference more obvious)

Tree Visualization

We change 1 line of our sourcecode (see previous tutorial for complete code):

var tree = d3.layout.tree().size([300,300]);
to
var tree = d3.layout.cluster().size([300,300]);

Continue reading

d3.js – Most simple stack layout with bars

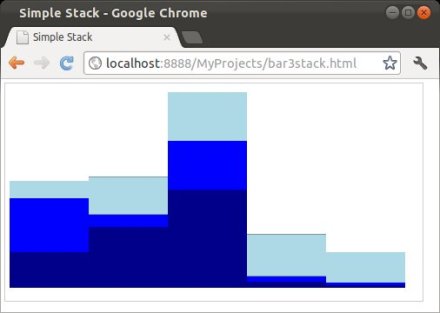
In order to understand the physics of various visualizations I walk through the samples and gists I find, dissect them and strip them down to the bare minimum. From there I explore my own variations. I took Mike’s sample for a stacked bar chart and changed it to chart reading from a matrix instead of the csv file.

Stacked Bar Chart

The matrix object

            var matrix = [
                [ 1,  5871, 8916, 2868],
                [ 2, 10048, 2060, 6171],
                [ 3, 16145, 8090, 8045],
                [ 4,   990,  940, 6907],
                [ 5,   450,  430, 5000]
            ];

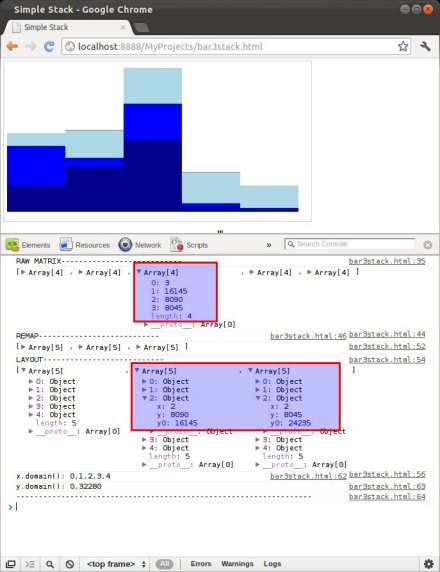
The stack layout expects an object with an array of objects, each member of the array represents the values of one value group (eg. “all dark blue values”), and each object contains x and y value. It will process theis array amnd a y0 value (the offset to the baseline).
You can see this if you run the below code with the console.log output.

Console

<!DOCTYPE html>
<html>
    <head>
        <title>Simple Stack</title>
        <script type="text/javascript" src="libnew/d3.v2.min.js"></script>
        <style>
            svg {
                border: solid 1px #ccc;
                font: 10px sans-serif;
                shape-rendering: crispEdges;
            }
        </style>
    </head>
    <body>

        <div id="viz"></div>

        <script type="text/javascript">

            var w = 960,
            h = 500

            // create canvas
            var svg = d3.select("#viz").append("svg:svg")
            .attr("class", "chart")
            .attr("width", w)
            .attr("height", h )
            .append("svg:g")
            .attr("transform", "translate(10,470)");

            x = d3.scale.ordinal().rangeRoundBands([0, w-50])
            y = d3.scale.linear().range([0, h-50])
            z = d3.scale.ordinal().range(["darkblue", "blue", "lightblue"])

            console.log("RAW MATRIX---------------------------");
	    // 4 columns: ID,c1,c2,c3
            var matrix = [
                [ 1,  5871, 8916, 2868],
                [ 2, 10048, 2060, 6171],
                [ 3, 16145, 8090, 8045],
                [ 4,   990,  940, 6907],
                [ 5,   450,  430, 5000]
            ];
            console.log(matrix)

            console.log("REMAP---------------------------");
            var remapped =["c1","c2","c3"].map(function(dat,i){
                return matrix.map(function(d,ii){
                    return {x: ii, y: d[i+1] };
                })
            });
            console.log(remapped)

            console.log("LAYOUT---------------------------");
            var stacked = d3.layout.stack()(remapped)
            console.log(stacked)

            x.domain(stacked[0].map(function(d) { return d.x; }));
            y.domain([0, d3.max(stacked[stacked.length - 1], function(d) { return d.y0 + d.y; })]);

            // show the domains of the scales
            console.log("x.domain(): " + x.domain())
            console.log("y.domain(): " + y.domain())
            console.log("------------------------------------------------------------------");

            // Add a group for each column.
            var valgroup = svg.selectAll("g.valgroup")
            .data(stacked)
            .enter().append("svg:g")
            .attr("class", "valgroup")
            .style("fill", function(d, i) { return z(i); })
            .style("stroke", function(d, i) { return d3.rgb(z(i)).darker(); });

            // Add a rect for each date.
            var rect = valgroup.selectAll("rect")
            .data(function(d){return d;})
            .enter().append("svg:rect")
            .attr("x", function(d) { return x(d.x); })
            .attr("y", function(d) { return -y(d.y0) - y(d.y); })
            .attr("height", function(d) { return y(d.y); })
            .attr("width", x.rangeBand());

        </script>
    </body>
</html>

My gist: bl.ocks.org/2940908